 "Urambo Tauro" (urambotauro)
09/26/2016 at 12:05 • Filed to: cl100, honda, motorcycle, project, wrenching, blog, first ride
 2
2
 19
19|
"Urambo Tauro" (urambotauro)
09/26/2016 at 12:05 • Filed to: cl100, honda, motorcycle, project, wrenching, blog, first ride | 2
| 19 |
Continued from !!!error: Indecipherable SUB-paragraph formatting!!! .
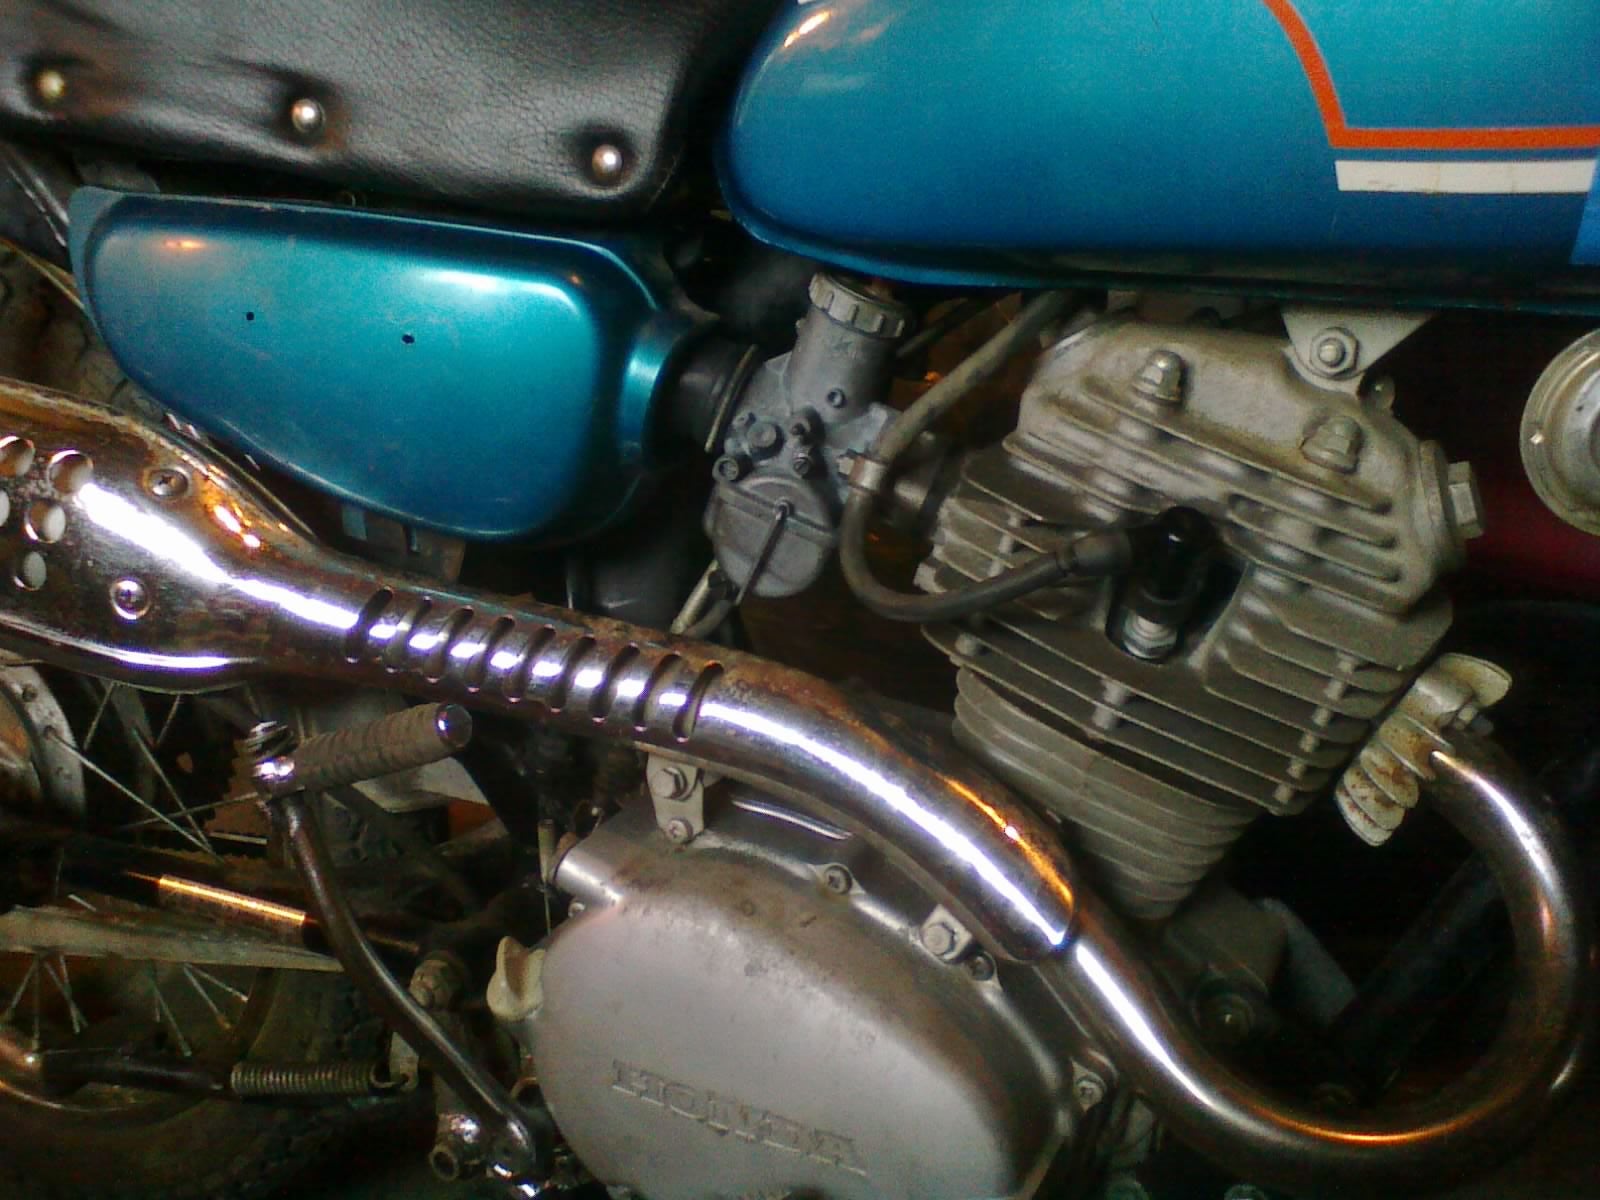
After completing installation of the air cleaner, battery, and seat, it was time to test my work. I checked the tire pressure, and was surprised to find them still holding air. Not sure if 40-year old tubes are safe for road use, but they should be fine for my backyard test run.
I fired the bike up after a few kicks, and hooked up my timing light to use its tachometer feature. The shop manual specifies a base idle of 1200 RPM, but it seemed to have a tendency to stall, so I aimed for 1500. I fiddled around with the two adjustment screws for a few minutes, then found what felt like a sweet spot. Eager to test the bike, I decide to leave finer adjustments for later.
I’ve never ridden a motorcycle, and it’s been a long time since I was on a bicycle. So for this test run, I kept it in first gear the entire time. I want to say that I was going at speeds of up to 15-20 MPH, but I can’t be sure because this test run revealed another issue: neither the odometer nor the speedometer are functioning.
While I managed to stay upright, I did stall it a few times. I still need to work on what I like to call “panic mode”, which should involve clutching and braking. Unfortunately, my muscle memory keeps telling me to use my feet to stop, and they’re completely unprepared to bring the weight of a motorcycle to halt.
I need to work on my weight shifting, too. I’m not used to leaning my body into turns while trusting the wheel grip to keep me from falling over. And since my right wrist needs to manipulate the throttle, bracing myself against the handlebars is tricky. Lots of things to practice before my riding skills are road-worthy.
But my practice soon came to an end, because after about 15-20 minutes of riding around the backyard, I couldn’t get it restarted after another stall event, and had to put it in neutral for the “walk of shame” back to the garage. There I fiddled around with the air screw and the throttle stop screw some more, trying to find that sweet spot again, but it seems to have developed a new symptom.

Once started, the bike will not idle without throttle application. I reconnected my timing tach, and found that I am having a hard time keeping it under 3000 RPM. With the throttle closed, the engine suddenly tries to surge up to somewhere around 7000 RPM or more, and when I adjust the throttle stop screw to bring it back down, it falls on its face. I try to catch it by opening the throttle, which despite my attempts to make the smallest of motions with the handle, surges the engine way back up again. The engine will not maintain a steady speed.
According to the shop manual, the idle stop screw is supposed to be adjusted for 1200 RPM, and the air screw is supposed to be turned to whatever offers the highest RPM. Aside from that, the book is disappointingly lacking except for a poorly-worded float adjustment procedure. There are some other things that I can tell are adjustable (like the position of the clip on the jet needle), but the book does not mention. So I just put it back together the way I found it. I found this chart in the shop manual, which might have the information I’m looking for, but I can’t decipher it.
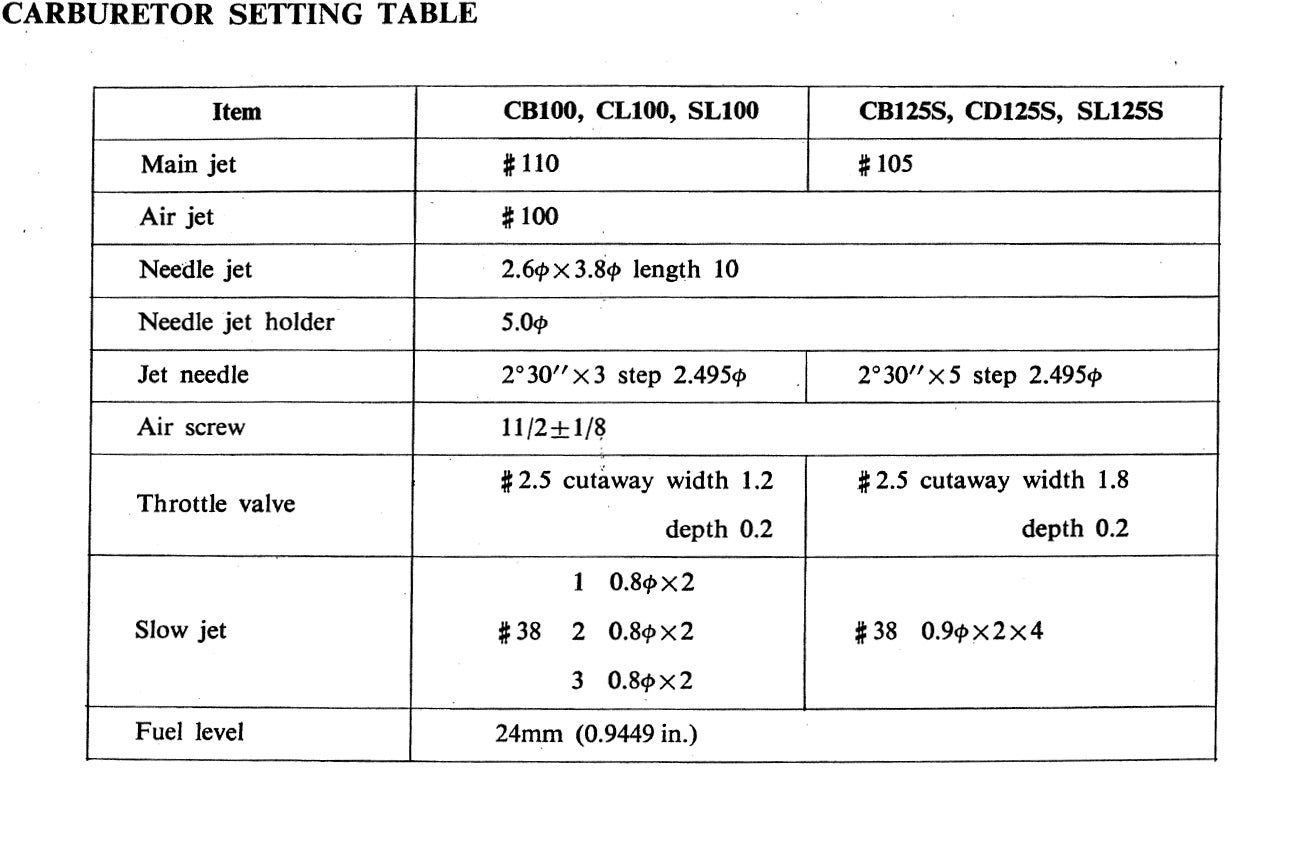
The only part of this chart that I understand is the 24mm “fuel level” (float adjustment).
Any ideas, Oppo?
 jimz
> Urambo Tauro
jimz
> Urambo Tauro
09/26/2016 at 12:19 |
|
I have no idea what they’re using phi to denote.
 bob and john
> Urambo Tauro
bob and john
> Urambo Tauro
09/26/2016 at 12:26 |
|
“I still need to work on what I like to call “panic mode”, which should involve clutching and braking. Unfortunately, my muscle memory keeps telling me to use my feet to stop,”
as of right now, stop everything you are doing to the bike. get some gear, and go take a class.
That, to me, is quite possibly the scariest thing I will read here. (aside from Denver’s moron snow driving techniques)
I dont mean this to come off as being an ass, but frankly, we dont need anymore misfortune story on oppo this year, and if there is anything I can do to stop that from happening, I will.
|
Urambo Tauro
> bob and john
09/26/2016 at 12:31 |
|
No offense taken. You’re absolutely right: a class should be the next step in riding.
But I have not yet committed to becoming a rider. The bike is still my father’s, and it’s going right back to him after I’m satisfied with my repairs. Yesterday’s backyard ride was kinda fun, but I’m not sure I’m going to be getting a bike of my own anytime soon.
|
bob and john
> Urambo Tauro
09/26/2016 at 12:37 |
|
all it take is one mistake on a test ride and you have a crashed bike and broken bones. trying to stop with your feet is quite possibly the quickest way to have both of those happen.
as for the fuelling issue: take the carb apart again. 1/2 decent chance you missed some gunk in one of the venturis and its clogged up the idle jet. Hence why it only runs on power.
 I hoon, therefore I am
> bob and john
I hoon, therefore I am
> bob and john
09/26/2016 at 13:10 |
|
calm down. dude was going slower than what I pull on a bicycle. if he’s not planning to actually begin riding, a class and anything above a helmet will be a complete waste of money.
|
I hoon, therefore I am
> jimz
09/26/2016 at 13:10 |
|
diameter
|
bob and john
> I hoon, therefore I am
09/26/2016 at 13:13 |
|
and guess what, 300lbs of motorcycle has a hell of a lot more energy and momentum then a bicycle. Believe me, you don’t need to be going more then 5mph if you have no clue what you are going.
 Pickup_man
> Urambo Tauro
Pickup_man
> Urambo Tauro
09/26/2016 at 13:35 |
|
I’m no expert but it sounds like you have an air leak. Check the boots between your carb and air box, and engine. Look for any visible cracks. Try to get the bike to idle as best as it can and take a can of carb cleaner and spray around the carb boots. If the engine speeds up when you spray, you have an air leak. Try to locate it and seal it back up.
Edit: Source, been there done that, try diagnosing that same problem with four carbs.
As Peter also recommended, go take a class. It sounds like you’ve got some bad habits and a class would be a great way to break those before you develop them further.
|
I hoon, therefore I am
> Urambo Tauro
09/26/2016 at 13:38 |
|
Glad to see the electrolysis worked for you! I didn’t etch or coat the interior of my XS650 tank, which may be why I have a little residual flakes in my filters.
The jet numbers give you an idea of jet size. The “air jet” sets idle mixture; lightly bottom the screw, then go out by 1.5 ± 1/8 turns. From there, continue going out in 1/4 turn increments until it begins to stumble. Go back in 1/4 turn from there.
Jet nomenclature:
Slow (aka pilot) jet feeds the engine in low-speed operation
Needle jet controls midrange and transition between low- and high-speed operation
Main jet controls high-speed
Poor idle suggests the pilot jet. You want to spray it with cleaner and compressed air to ensure it isn’t clogged; a guitar string or tiiiiny drill bit may be effective, as well. The float levels also impact engine operation to a surprising (for a car guy) extent.
You could also check for vacuum leaks by spraying starting fluid around the carb area. The rubber carb holder may have become brittle and/or cracked, even if it’s not obvious.
Here’s a good write-up of Honda motorcycle carburetors.
|
Urambo Tauro
> I hoon, therefore I am
09/26/2016 at 14:20 |
|
Very useful info there; thank you! It was bothering me that I was just putting things back the way I found it. I didn’t feel like I was actually learning anything.
I’ll take it back apart later today. Do you suppose that the lead solder that I used to repair the float might make it heavy enough to require a custom adjustment, say 25 or 26mm instead of 24?
|
Urambo Tauro
> Pickup_man
09/26/2016 at 14:40 |
|
Thanks for the tips!
I’m going to look into classes, but depending on cost and what’s involved, there’s a good chance that I might hold off and just stick with low-speed backyard stuff for the short time that I’ll have this bike. I’m only test-riding it to check my work anyway. Once the wrenching is done, I’ll be turning it right back over to my father.
This test run was a good reminder that I’m going to need some real training if I ever want to get a bike of my own. I’m not ready for anything more than parking lot speeds. I also learned what I needed to learn mechanically, such as the inop speedometer and odometer.
|
I hoon, therefore I am
> Urambo Tauro
09/26/2016 at 16:06 |
|
It’s likely! You could probably go up another millimeter.
Another way you could go is to install a valve or nipple in place of the drain plug, and use clear tubing to check the fuel level itself. You’ll probably have to measure and math your way to the proper level (I assume that 24mm is from the fuel bowl split line to the top of the float, with the carb upside-down). See here for reference (can’t embed photos from my current location).
|
Urambo Tauro
> I hoon, therefore I am
09/26/2016 at 16:24 |
|
As near as I’ve been able to figure, I think that 24mm is supposed to be the measurement from the bottom of the float to the base of the upper carburetor body (with the float just barely touching the float valve). This is based trying to decipher the wording used in the shop manual:
CARBURETOR
Float level adjustment
1) Set the carburetor on its side.
2)Raise the float lightly with the finger tip and locate the position of the float where the float arm and the float valve are either barely touching or provided with a clearance of 0.1 mm (0.003 in.)
3) In this position, the height of the float above the carburetor body should be 24 mm (0.826 in.) when measured at the side of the float. If adjustment is necessary, carefully bend the float arm.
“The height of the float above the carburetor body”? Doesn’t sound like the carburetor is still on its side as it was in step 1...
|
Urambo Tauro
> I hoon, therefore I am
09/26/2016 at 16:57 |
|
Is the pilot jet supposed to be clear all the way through along its length?
Right now, only the narrow tip tube is clear. It is open at the tip, and hollow down to the threads. It is also open through the 6 tiny holes in the side.
The other end of the pilot jet (where the flat-head screwdriver engages) has another hollow cavity that extends up to the threads. Is it supposed to be sealed at the threads, or is that a blockage that needs to be cleaned out?
|
Urambo Tauro
> I hoon, therefore I am
09/26/2016 at 17:04 |
|
Diameter ...in millimeters, perhaps? That sounds like it could be it.
|
I hoon, therefore I am
> Urambo Tauro
09/26/2016 at 21:40 |
|
Yes it’s diameter in millimeters.
|
I hoon, therefore I am
> Urambo Tauro
09/26/2016 at 21:47 |
|
Yeah, so the measurement is from the gasket surface. But that’s a bizarre way of measuring it. It sounds like you keep the carb on its side, and have the float arm just barely touch the valve, then measure from the gasket surface to the side of the float. I’m used to the “measure with carb upside-down so the float rests on the valve” method.
Theoretically, the fuel level comes to the side of the float from where the measurement is taken. You could mark/measure a clear tube for 24mm from the gasket surface, as I mentioned earlier. It’s assuredly easier than I’m describing, you’d just need to find or make a nipple or valve to fit the drain plug (take the plug to a hardware store to match threads).
|
I hoon, therefore I am
> Urambo Tauro
09/26/2016 at 21:50 |
|
From what I’ve read, yes it should be . The pilot jets in the Mikunis on my XS650 are straight-through, with a small orifice (the “jet” part) near the screwdriver slot and a couple passages out the side.
|
Urambo Tauro
> I hoon, therefore I am
09/26/2016 at 22:12 |
|
Yeah after typing that, I went through the carb very carefully, and followed the flow of fuel to get a better idea of where it goes and how it gets there. The pilot jet definitely needs to be open all the way through, or it would never be able to draw up fuel from the float chamber. I also found something else that makes me glad that I had a reason to open it back up, and will include that in tomorrow’s post...